While troubleshooting any WordPress issues, you are asked to deactivate all plugins and activate them one by one. This sounds enormously handy if you have entry to WordPress dashboard, but what if you function not have access of wp-processing !!! Most of the period, afterward you are brute asked to deactivate all plugins, you have already locked yourself out from accessing the WordPress dashboard.
In this article, we are going to discharge loyalty you, how you can deactivate all WordPress plugins furthermore you get accord of not have access to the WordPress dashboard.
Deactivate All Plugins Using FTP/cPanel file manager
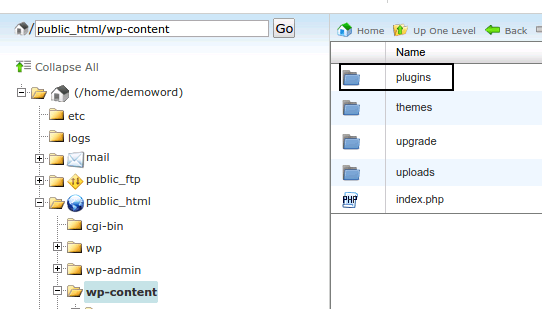
You can deactivate all WordPress plugins either through FTP or through cPanel file manager. In both cases, you just need to navigate to /wp-content/ folder and rename it. Following are the complete steps for cPanel file manager method:

- Login at cPanel, Under Files section, Go to File Manager.
- Select Web Root (public_html/www) and click Go.
- Expand the public_html folder, and navigate to the /wp-content/plugins folder.
- Right click on the /wp-content/plugins folder and rename it like plugins.old. This will deactivate all of the plugins at once.
- Now, reactivate plugins folder again by renaming back to plugins. This will allow you to access the WordPress Dashboard again.
- Now you can activate one plugin at a time until your website breaks again. When it does, you’ll know the culprit plugin.
Deactivate all plugins through phpMyAdmin
You can also deactivate all plugins through phpMyAdmin. Following are the complete steps:

- Login at cPanel, under Databases section, locate phpMyAdmin and click on it.
- You will be redirected to phpMyAdmin control panel.
- At phpMyAdmin control panel, from the left hand side pane, select your WordPress database.
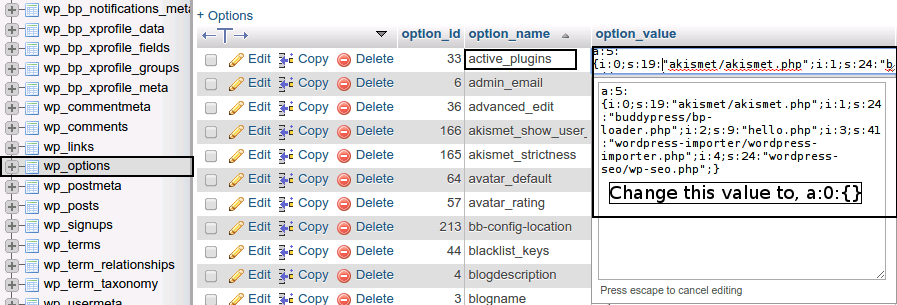
- Now, from the right hand side locate the table wp_options and click on it.
- Under the option_name column (field) find the active_plugins row.
- Click on option_value field and change it to: a:0:{}

